Let’s see a user question in the beginning
“What plug-in do I need to install so i can import and edit Canon EOS C500 .MXF video files in Final Cut, iMovie, Avid Media Composer, FCP X. The suggestion of doing Log and Transfer doesn’t work (the .MXF files are gray out not allowing me to select it.)
Our Quick Answer
If you want to import Canon EOS C500 4k video or 1080p MXF footage in nonlinear editing programs such as FCP, iMovie and Avid MC, you might need to take time to convert before you can start post production. Take Final Cut Pro for example, FCP’s native format is Apple ProRes, which means that files saved to this codec do not require any rendering in FCP in order to play them back. However, the Cinema EOS C500 doesn’t typically use this codec, so if you were to import the MXF footage directly into FCP without using the Log & Transfer function, you may convert your Canon C500 4K videos or MXF files to Apple ProRes using 3rd party Plugin like HD Video Converter for Mac.
This third-party plug-in available for free trail download

How to transcode/convert Canon EOS C500 MXF clips to iMovie, FCE, Avid and FCP X
Step 1. Add MXF files
Please connect your canon c500 to iMac (Mac book) with USB or use card reader to transfer the .mxf files to Apple hard drive disk. Run Mac HD Video Converter click “Add Video” or “Add from folder” to ingest your source media from your camera or from an achieved folder.
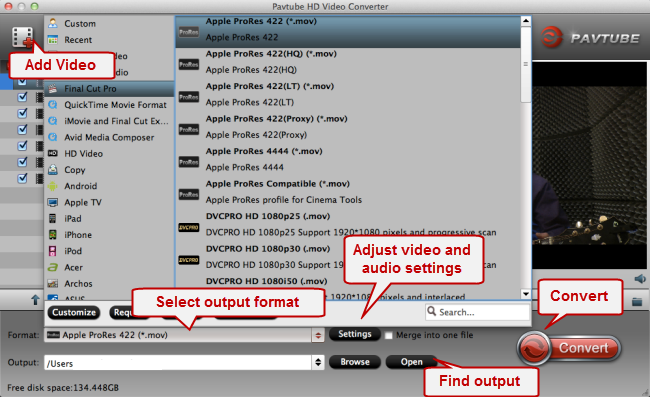
Step 2. Choose “ProRes” or “AIC” or “DNxHD” as output format
1. edit Canon EOS C500 MXF with FCP 6/7 or FCP X:
From the Format bar, click “Final Cut Pro > Apple ProRes 422 (*.mov)” as output format. Apple ProRes is the best suited editing code for FCP 6, 7 and FCP X.
2. Transcode Canon EOS C500 MXF to AIC for iMovie or FCE:
From the Format bar, click ” iMovie/Final Cut Express > Apple InterMediateCodec (*.mov)’ as output format.
3. Convert Canon EOS C500 MXF to footage to DNxHD for Avid:
From the Format bar, click “Avid Media Composer” and choose “Avid DNxHD (*.mov)” as output format.
Step 3. Custom video and audio settings. (Optional)
If you like, Click “Settings” button, the “Profile Settings” window pops up, on which you are allowed to custom video and audio parameters like bit rate, frame rate, resolution, sample rate, and audio channels.

Step 4. Start Convert Canon EOS C500 MXF file
Click the “Convert” button under the preview window to transcode Canon EOS C500 files to a format that is well suited for your NLEs. If you do not want to wait a long time, You can tick off “Shut down computer after conversion” and go away to do other things instead of waiting around in front of the computer for the entire conversion process.
Step 5. Import has been converted file to iMovie, FCE, Avid and FCP X
click “Open” button to get the generated QuickTime files that encoded with ProRes, AIC or DNxHD codec. Now you are able to open them in Final Cut, iMovie or Avid for further editing without any import issues.
Also read:
Encoding Canon EOS C500 MXF for FCP and Avid on Mac Mavericks
Transcode Canon EOS C500 MXF footage to AIC for iMovie
Editing/Transcode Canon EOS C300 MXF footage to ProRes codec for Final Cut Pro
Import/Transfer Canon EOS C100 AVCHD footage to Final Cut Pro
No comments:
Post a Comment