The Panasonic HC-V750 1080p Full HD Camcorder features four drive lens system. It encompasses a 20x optical zoom lens and the latest BSI CMOS sensor. Features full HD 1080p movie quality in ACVHD format, 5-axis hybrid OIS, remote shooting, slow-motion and manual modes. Furthermore the Panasonic HC-V750 has integrated Wi-Fi connectivity and baby monitor mode. If you attempt to import and edit the 1080/60p AVCHD files with Final Cut Pro on Mac, you may find those programs do not support the 60p files well.
In order to import Panasonic HC-V750 AVCHD files into FCP successfully, we need to convert AVCHD to iMovie supported video formats like MOV, MP4 etc on Mac. At this time, you need the Mac Panasonic HC-V750 AVCHD to FCP Converter. With this converter, you can easily convert AVCHD to MOV for FCP.
The Mac AVCHD to FCP Converter is designed to help Mac users to convert Panasonic HC-W850, HC-V750, HC-V550CT, HC-V250 and HC-V130 AVCHD videos to other video formats. such as MOV, MP4, WMV, AVI, FLV, MPEG, 3GP, MKV, VOB, etc. Besides, with this Panasonic HC-V750 AVCHD to Apple ProRes Converter Mac, you can finish the conversion with high speed and high output quality. You also can trim, crop, merge videos, add watermark etc.
Free download AVCHD to FCP Converter for Mac

Follow the guide, you can convert Panasonic HC-V750 AVCHD to FCP easily on Mac.
Step 1. Add AVCHD Video
From the main interface, click “Add Video” or “Add from folder” button to import MTS/MP4 clips taken with a Panasonic HC-V750 camcorder.
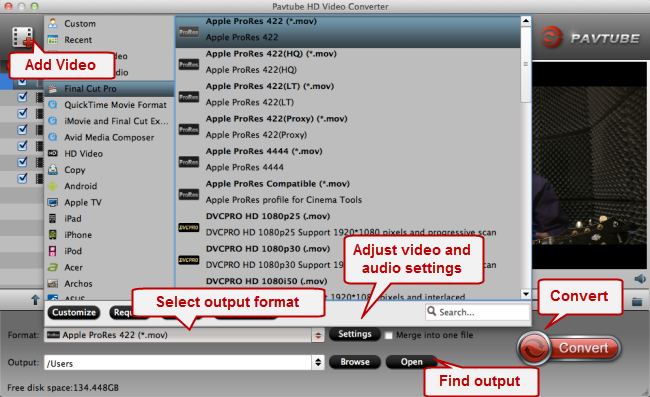
Step 2. Select output format for Final Cut Pro
Click on “Format”, and select output format from the drop-down list, you can select Final Cut Pro > Apple ProRes 422 (HQ) (*.mov) as output format. Then click the “Settings” button and choose 1920*1080 as output video size to keep HD quality. If you are using FCP 7, you can choose Final Cut Pro > Apple ProRes 4444 (*.mov) as output format.
Step 3. Custom video and audio settings (Optional)
If you want to adjust video and audio settings like video bit rate, frame rate, audio bit rate, sample rate, and audio channel, you can click ‘Setting’ button and go to ‘Profile Settings’ panel to do so, if not, simply skip this step.
Step 4. Conversion
Click the convert button. The HC-V750 AVCHD to FCP Converter starts to run conversion processing at high speed. When the conversion finished, click “Open” button to import these converted video into FCP for editing to make your own movies.
Also read:
Convert Panasonic HC-W850 recordings to QuickTime for iMovie, FCP and Avid
Import GXF files into VLC Media Player for Playback
Convert Panasonic HC-V550CT AVCHD/MP4 to iMovie, FCP and Avid
AVCHD Workflow-transcode Sony HDR-CX330 AVCHD to QuickTime MOV for editing and playing
Transcode Canon EOS C100 AVCHD for iMovie, FCP and Avid
No comments:
Post a Comment