Wednesday, May 28, 2014

Nikon D3300 and FCP workflow-Convert D3300 MOV file to ProRes for FCP editing on Mac

According to the company, The black Nikon D3300 DSLR Camera is a compact and versatile camera featuring a DX-format 24.2 megapixel CMOS sensor and EXPEED 4 image processor. The sensor and processor combine to realize high-resolution imaging, notable low-light sensitivity to an expandable ISO 25600, continuous shooting to 5 fps, and full HD 1080p video recording capabilities. We can get 1080p H.264 QuickTime MOV via Nikon D3300.

The point here, many users are facing issues and find it a painful experience to import Nikon D3300 footage into Final Cut (which includes the FCP X, FCP 7, FCP 6 or the former), How to solve the crashing problem and avoid rendering? Here, I am looking at how to bring Nikon D3300 recordings into Final Cut Pro on Mac. Fortunately, there is an easy way to fix the issue. Since Final Cut Pro is designed to work best in ProRes 422 codec, the easy workaround is to use 3rd-party software to convert Nikon D3300 H.264 MOV to ProRes MOV for FCP 6, FCP 7, and FCP X.

HD Video Converter for Mac here is highly recommended as the best application for Mac users to convert Nikon D3300 footage to ProRes MOV with ease. In addition to ProRes, it can also convert Nikon D3300 h.264 MOV to other popular video formats like MP4, AVI, WMV, MKV, FLV, 3GP, VOB and more. The applied leading acceleration technology guarantees fast conversion speed and high output video quality. Get it now and follow the steps below to convert your Nikon D3300 MOV movies.

Download Mac HD Video Converter


How to convert Nikon D3300 H.264 MOV to ProRes MOV on Mac

Step 1. Add Nikon D3300 Video files
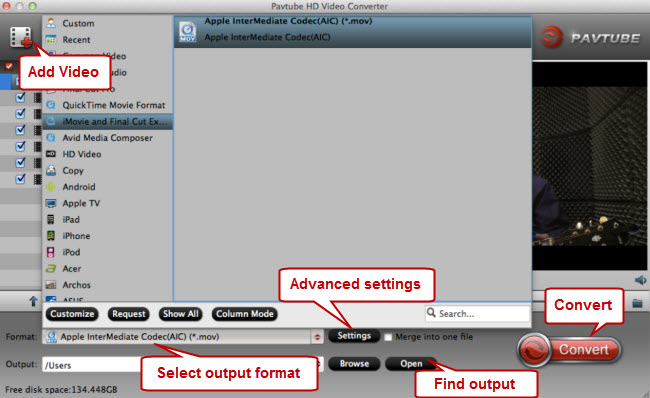
After downloading, click the PKG file and follow the wizard to install the program. click "Add Video" button to import H.264 mov shoorings captured by your Nikon D3300 camera, you are allowed to load directly from a camera or from a card reader, or from a folder on your HDD that stores your source media.


Step 2. Choose Apple ProRes format
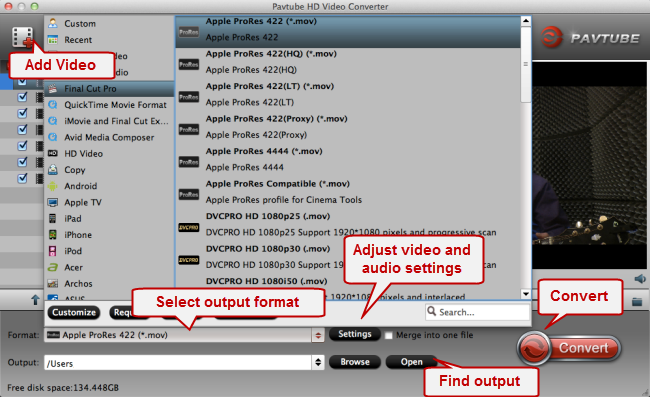
From the Format bar, click "Final Cut Pro > Apple ProRes 422 (*.mov)" as output format, This is the best profile for importing video into FCP X. for getting ProRes 444 video, you need to choose "Apple ProRes 444 (*.mov)".

Step 3. Profile Setting
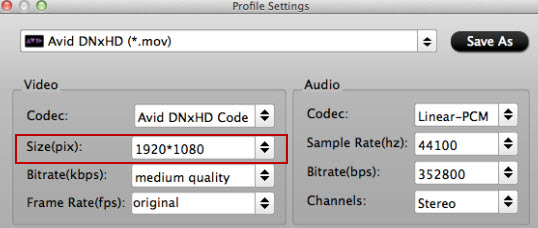
If you like, you can Click "Settings" button to adjust the resolution, bitrate, etc. Just customize the parameters to meet your need. If you want to trim, crop Nikon D3300 video via this program, just clicking on "Edit" icon. By the way, batch conversion is also supported by the Nikon D3300 to FCP Converter tool.


Step 4. Start converting Nikon D3300 video
Once all the settings are OK, you can click on the Convert button to start converting your Nikon D3300 H.264 MOD files to ProRes MOV format. When the conversion ends, you are free to import your converted videos to FCP and other portable device, editing software or even share them with others on Facebook, YouTube and other sites.

More Tips:

Transcode Canon Rebel T4i/EOS 650D H.264 MOV to Apple ProRes for Final Cut Pro 6/7/X

The Best way to import Nikon D7000 MOV to iMovie/FCP X

How to Import Canon 5D3 H.264 MOV to iMovie/FCE/Avid/FCP

Convert Canon EOS 600D/650D/700D MOV Video to iMovie on Mac (Mavericks)

MXF Workflow-Import Canon EOS C300 MXF to FCP for editing

Friday, May 23, 2014

Convert/edit DVR-MS video to AIC MOV for FCE on Mac

DVR-MS (Microsoft Digital Video Recording) is a proprietary video and audio file container format, developed by Microsoft used for storing TV content recorded by Windows XP Media Center Edition, Windows Vista and Windows 7. Multiple data streams (audio and video) are wrapped in an ASF container with the extension DVR-MS. Video is encoded using the MPEG-2 standard and audio using MPEG-1 Layer II or Dolby Digital AC-3 (ATSC A/52).

Final Cut Express was a video editing software suite, now discontinued, created by Apple Inc. It was the consumer version of Final Cut Pro and was designed for advanced editing of digital video as well as high-definition video, which was used by many amateur and professional videographers. Final Cut Express was considered a step above FCE in terms of capabilities, but a step underneath Final Cut Pro and its suite of applications. As of June 21, 2011, Final Cut Express was discontinued, in favor of Final Cut Pro X.

Are you frustrated when you can not open the DVR-MS files on your Mac? Do you want to change the DVR-MS video files into MOV files so that you can edit them in FCE?

In order to work with DVR-MS videos in FCE, you need to convert the dvr-ms files to Apple InterMediateCodec (AIC) .MOV, which are naturally supported by FCE, iMovie.

Here Mac DVR-MS to FCE Converter is highly recommended as the best DVR-MS to Final Cut Express converter to convert .dvr-ms and .wtv files to Final Cut Express compatible videos with ultra-fast conversion speed and lossless video quality so that you can add the video to FCE for editing. It provides the video preset for FCE so you don’t need to worry about the compatibility. In addition, output formats like MTS, XAVC, MOV, MP4, AVI, WMV, MKV, FLV, etc. are provided and 150+ video presets for portable devices like iPhone 6, iPad 4, iPod, etc. are offered for your choice. Just download it and follow the steps to get your work done.

Download DVR-MS to FCE Converter


How to convert and import DVR-MS file to Final Cut Express

Step 1. Add DVR-MS Videos
Install and run Mac DVR-MS Video Converter, The software interface is as below. you can either click “Add Video” to import the DVR-MS Video files you want to convert for FCE.


Step 2. Select AIC MOV as output format
Click the “Format” list and select Apple InterMediateCodec (AIC)(*.mov) from “iMovie/FCE” as the output video format. As you see, you can also convert Add DVR-MS to iMovie, Final Cut Pro, Avid, QuickTime, FCP X/6/7 etc.

Step 3. Start convert DVR-MS video to FCE
OK, now let’s go to the last step: click the “Convert” button to start converting the added DVR-MS video to FCE. The conversion will finish soon if your videos are not too large. After the conversion, the destination folder will open automatically. Then start FCE and click File > Import > Files to import the converted DVR-MS video files to FCE.


More tips:

Convert DVR-MS video to iMovie on Mac

Import Sony FDR-AX1 4K XAVC-S MP4 to iMovie, Avid, FCP

Editing Sony Alpha AVCHD footage in Premiere Pro

Convert XAVC to Apple ProRes for FCP on Mac

Convert WTV/DVR-MS to AVI in Windows/Mac

Convert DVR-MS video to MP4, WMV, AVI, FLV, 3GP, MPG, VOB, MKV etc

Sony Alpha iMovie workflow-Convert Alpha A7 AVCHD MTS to iMovie

Summary: This topic convers how to convert and import Sony Alpha AVCHD footage to your Mac and how to solve the import issues while loading AVCHD MTS clips into iMovie.

Sony Alpha series are a list of popular digital cameras. The best selling ones include Sony Alpha A7, Sony Alpha A7R, Sony Alpha A7S, Sony Alpha A99, Sony Alpha A77/A7/A65/A3000, Sony Alpha NEX-3N/NEX-7/NEX-6/NEX-5 etc and more models. With high definition recording capacity, most of the camcorders in this series enables users capture AVCHD (.mts/.m2ts) video clips with excellent visual effect.

After recording the nice footage, do you have the same frustration as the person here: I’ve got a Sony Alpha A7R camera, however, the AVCHD files can’t be recognized by iMovie. Really need to figure this out for work. Well, the most commonly used video codecs by iMovie are DV, MPEG-4, H.264 and AIC. If you want to import Sony Alpha AVCHD to iMovie for editing, you’d better convert the MTS/M2TS files to one of the codecs mentioned above.

How to Convert Sony Alpha AVCHD (.mts/.m2ts) to iMovie Format?

What you need is a conversion program that can help you convert the Sony Alpha AVCHD files while preserving the original HD video quality. Sony AVCHD Converter for Mac can help you finish the conversion quickly. It enables users to convert Sony Alpha MTS/M2TS to iMovie format in simply three steps. This software is the best Sony AVCHD to iMovie converer. You can customize the output video’s encoder, resolution, bit rate and frame rate as you need.


Firstly, transfer the video clips you recorded from your Sony Alpha cameras to computer by USB cable connection or firewire. After you launch the Mac converter, click add video icon to load the Sony Alpha recordings into Sony AVCHD Converter. You can add several videos for conversion each time.


Second, select “iMovie -> Apple InterMediate Codec (AIC)” as the output format from the drop down menu of “Format”.

You can click “Settings” button, and you will be able to change the output video’s settings.


At last, begin the Sony Alpha AVCHD MTS to iMovie conversion by hitting the convert button. The converted files will be in the output folder when the conversion finishes.

Tip: If you want to import and edit Sony Alpha AVCHD video in Final Cut Pro, this Sony AVCHD Converter provided you the best profile for FCP X, FCP 7 and FCP 6 users.

More Tips:

Import Sony PXW-Z100 XAVC Footage in Avid, FCP X, iMovie and Premiere

Edit Canon Rebel T3i/T4i/T5i 1080p MOV to iMovie on Mac

Convert Canon VIXIA HF AVCHD to AIC for using in iMovie

Convert Sony PXW-Z100 4K XAVC to ProRes for FCP

Import Canon H.264 MOV footage into Windows Movie Maker

How to Convert/Import Sony Alpha AVCHD footage in Premiere Pro

Summary: If you are looking for the best workflow between Sony Alpha cameras and Premiere Pro, you may come to the right place. This article convers the topic of how to convert Sony Alpha AVCHD footage to MPEG for Premiere Pro.

Sony Alpha A7, Alpha A7R, Alpha A7S, are all very popular sellers in the Sony Alpha series, and also in the photography market. All of the three DSLR cameras can record full 1080p AVCHD videos in MTS format. While enjoying the stunning HD image quality, many folks may find it a painful experience to import Sony Alpha A7/A7R/A7S .mts files into Premiere Pro for further editing.

Well, a bit frustrating. The Sony Alpha AVCHD highly compressed files are still not well supported by Premiere Pro including the latest CS6, CC7, as you may encounter many audio and video problems. And I know that Premiere Pro can't handle raw AVCHD videos encode in H.264, so there is no doubt that it will take more time on rendering while ingesting the files. Back to the piont, if you're attempting to edit Alpha A7/A7R/A7S .MTS clips with Premiere Pro, what's the available workaround?

Fortunately, there is an easy way to fix the issues. To get the work done, the H.264 compression format requires that files be transcoded into a format better suited to editing, effects, and color grading; this would usually be .mpg or .wmv files. So the easy option to get Premiere Pro work with AVCHD footage beautifully is to rewrap and convert Sony Alpha AVCHD to MPG or WMV via Sony AVCHD Converter. This will help you import the file correctly and saving the rendering time.

To fulfill your task, you can just get Sony Alpha AVCHD Converter for Mac, a powerful video converter, editor and player. It offers an optimized presets for Premiere Pro for easy access. Besides transcoding MOV to Premiere supported videos with optimized settings while keeping the video quality, the all-in-one and easy-to-use toolkit can convert all other popular video formats like AVI, MXF, MP4, WMV, MKV, FLV, ASF, M2TS, VOB, etc. to Premiere Pro, iMovie, FCP, FCE, Avid MC and more NLEs natively supported video formats on Mac OS X (Mavericks and Mountain Lion included) with fast encoding speed. See how below about converting AVCHD to MPG/WMV format.


Supported camera models:
Sony Alpha A7, Sony Alpha A7R, Sony Alpha A7S, Sony Alpha A99, Sony Alpha A77, Sony Alpha A7, Sony Alpha A65, Sony Alpha A3000, Sony Alpha NEX-3N, Sony Alpha NEX-7, Sony Alpha NEX-6, Sony Alpha NEX-5.

How to Convert Sony Alpha AVCHD (.mts/.m2ts) for Premiere Pro?

Step 1. After downloading, install and run this AVCHD Converter for Premiere Pro, just copy the AVCHD files from your camera to your hard drive. Import the files to the software for converting.


Step 2. Click "Format" bar to choose the output format. click "Adobe Premiere/Sony Vegas", you will see several profiles. The MOV (AVC) (*.mov) is recommended for its good video quality and perfect video/audio sync settings.


Step 3. Click "Settings" button, you can adjust the video and audio parameters, including the Bitrate of Video&Audio, Video Size, Sample Rate, Frame Rate, Audio Channels, etc., by clicking the Settings button on the main interface for getting the best quality.

Step 4. Click the arrow button to start transcoding Alpha AVCHD to MPG(MPEG-2) for Adobe Premiere Pro.

After the process completes, click "Open" button to find the generated videos, and then you can transfer the recordings to Adobe Premiere easily and quickly. In this way, you can edit your Sony Alpha A7/A7R/A7S AVCHD .mts files in Premiere Pro smoothly.

More Tips:

Canon Vixia HF G10/G20 AVCHD capable with Avid, Premiere Pro

Convert/Import Sony Alpha AVCHD MTS to iMovie

Import Sony F5 XAVC files to Premiere Pro

Import Sony FDR-AX1 4K AVCHD/XAVC S to Premiere Pro

Import Sony PXW-Z100 XAVC Footage in Avid, FCP X, iMovie and Premiere

Wednesday, May 14, 2014

Sony F55 and Premiere workflow - convert sony f55 xavc to premiere

With every new camera, comes many new questions about workflow. The term ‘workflow’ can be fairly broad, but today I am looking at importing F5 footage into various non-linear editing systems (NLE). The F55 uses the same workflow as the Sony 4K Digital Motion Picture Cameras (which includes the F5 and F55), because it records in the same format. However, the tools for importing the footage have been updated by Sony. Below, I outline how to import Sony F55  XAVC footage into Premiere. Keep reading for a brief how-to on each process.

"Trying to get 1080p XAVC footage from an F55 to work in Pr CS6 (Mac). It imports, but when I try to do anything with it, it crashes. Apparently I need a plug in. Does anyone know what I can possibly do???"

Theoretically, Premiere CS5 and Premiere CS6 supports both of these two format footages as it's said in adobe.com. In fact, Premiere does not prefer to work with .mts and .mxf for that it appreciates MOV (H.264 codec), MPG (MPEG-2 codec) amd WMV (WMV3 codec) files. So, if you find it doesn't work and you don't want to bother so much about the further setting of Premiere, you can take my advice into consideration. That is, you can use some third-party software to convert your Sony F5 XAVC footages to MOV or WMV, the best supported formats for Premiere. If you want to try, use Sony F55 Video Converter for Mac. It has excellent quality of videos as it applies advanced audio and video sync technology, which is a native format for Premiere CS5, CS5.5 and CS6.

Free download Mac Sony F55 Video Converter


How to import Sony F55 XAVC to Premiere via F5 video converter?

Step 1: Download and run Sony F55 Video Converter for Mac, When the main interface pops up, click "Add Video" button to import XAVC shootings captured by Sony PMW F55. you can load directly from a camera or from a card reader, or from a folder on your HDD that contains you media data.


Step 2: Choose Premiere supported format
Click "Format" and choose "Adobe Premiere/Sony Vegas", you will see several profiles. The MOV (AVC) (*.mov) is recommended for its good video quality and perfect video/audio sync settings.


Tips: If you like, you can click "Settings" to customize output video size, bitrate, frame rate and other settings at your needs. You are allowed to adjust output video and video parameters. However, if you have no idea about profile setting, keep it as original recordings will provide you the files with less quality loss, and keep default settings is also a good choice for your to get a high quality files.

Step 3: Press on the big "Convert" button to transcode Sony F55 XAVC footage to Adobe Premiere format. When conversion completes you can find converted video by clicking "Open" button. After being converted to video editing program compatible format the Sony PMW-F55 XAVC footage can be imported to Adobe Premiere CS5, CS5.5 and CS6.

More Tips:

Import Sony F5/F55 XAVC to FCP

Transcode Sony F5/F55 XAVC files to AIC for iMovie/FCE

Convert Sony F55 4K XAVC to DNxHD MOV for Avid MC

MP7 Converter for Mac – convert MP7 files on Mac OS X

Wednesday, May 7, 2014

Sony PMW-300K1 Workflow with QuickTime - can i convert MXF to QuickTime MOV on Mac

Sony's new PMW-300K1 XDCAM camcorder is the first semi-shoulder mount camcorder to combine the benefits of 1/2-type Exmor™ Full HD 3CMOS sensor technology with 50Mbps HD recording at MPEG HD422 as MXF files (UDF mode only), However, MXF is not a Mac friendly video format so you can't play and edit them with Apple software and devices like QuickTime, iMovie, Final Cut Pro, Avid, iPhone, iPad, iPod and more. If you want to play PMW-300K1 MXF smoothly on Mac, you'd better convert MXF to QuickTime MOV format, a Mac friendly format.

To convert PMW-300K1 MXF video files to QuickTime MOV, Here MXF to MOV Converter for Mac is best choice, and it can help you finish the conversion in clicks. In addition to MXF files, it can also convert sony pmw-300k1 mxf to mp4, wmv, mpg, avi, vob, mpeg, m4v, flv, mkv, 3gp etc with outstanding quality and super high fast conversion speed. Moreover, the built-in editor lets you personalize your videos by trimming, cropping, rotating, adding watermarks, etc.

Download a free trial of Sony PMW-300K1 Video Converter for Mac:


Convert Sony PMW-300K1 MXF files to QuickTime MOV for playing on Mac

Follow these steps:

Step 1. Import Sony PMW-300K1 MXF Videos
Install and launch the Mac MXF Video Converter, Then you can click "Add Video" button to import MXF videos from Sony PMW-300K1. you can load directly from a canera or from a card reader, or from a folder on your HDD that cantains your media data.


Step 2. Choose MOV as output video format
Select an output video format that is compatible with QuickTime. As we know, MOV is a QuickTime format. So here you can click "Format" list and choose "Common Video" -> "MOV - QuickTime Video (*.mov) as the output video format. For advanced settings, please click the gear button that appears on the top right of the format to customize output video resolution, frame rate, bit rate, etc. as you like.


Step 3. Start convert your MXF videos
Click the big "Convert" button and you can convert Sony PMW-300K1 MXF to QuickTime MOV on Mac with high quality. After conversion, you can play converted PMW-300K1 MXF videos on QuickTime or edit the files on FCP, FCE, iMovie and Avid etc on Mac.

Recommended Products:MXF Video Converter for Mac ($35.00)Also read:

Edit Canon XF100 MXF to Avid MC, Premiere Pro and iMovie/FCE

Transfer H.264 MOV file from EOS 5D Mark III to FCP

Convert HPX170PJ MXF to Quicktime MOV on Mac

Transcode Panasonic AG-HPX170PJ MXF to Apple ProRes 422 for editing on FCP