Firstly, see a user question
“I bought a Canon EOS 5D Mark III camcorder, and I used it recorded many videos on my holiday life. Now, I want to edit these videos in FCP on Mac, but the problem is that I can’t import EOS 5D Mark III MOV files into FCP soomthly. Anyone can help?” A Mac user asked in the forum.
Our answer
As we know that Canon EOS 5D Mark III provides Full-HD 1,920 x 1,080 Video file Recording, However, you may come across problems when trying to import EOS 5D Mark III MOV to Final Cut Pro. This could happen because of the different codec in a number of MOV (MPEG-4 AVC/H.264) files as Final Cut Pro might not support all of these codecs. If you want to transfer or edit Canon EOS 5D Mark II H.264 MOV in FCP without any troubles, you’d better convert MOV to ProRes 422, a FCP preferred format.
To import EOS 5D Mark II MOV files to FCP, a video converter is needed. Here Mac Canon EOS 5D Mark III Video Converter is just the right choice for you. With it, you can easily editing Canon 5D Mark III h.264 MOV in FCE, FCP (X), In addition, you can also use this Mac format converter program to transcode 5D Mark III video files to AIC for FCE, convert 5D Mark III h.264 videos to Apple ProRes for FCP version 6, 7 and FCP X, as well as encode 5D Mark III MOV to DNxHD for Avid Media Composer.
Free download Canon 5D Mark III Converter for Mac

How to convert Canon 5D Mark III 1080P H.264 MOV to FCP for editing on Mac
Follow these steps:
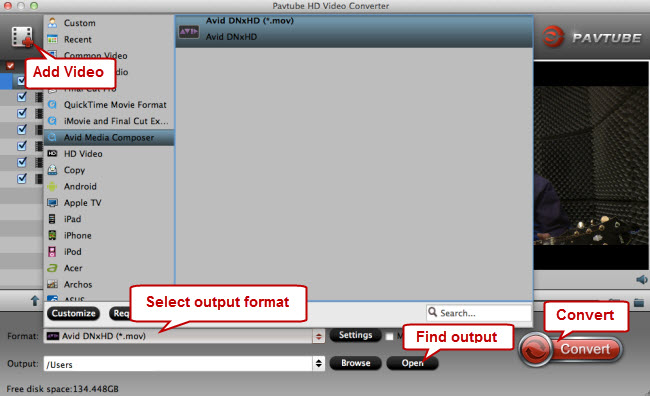
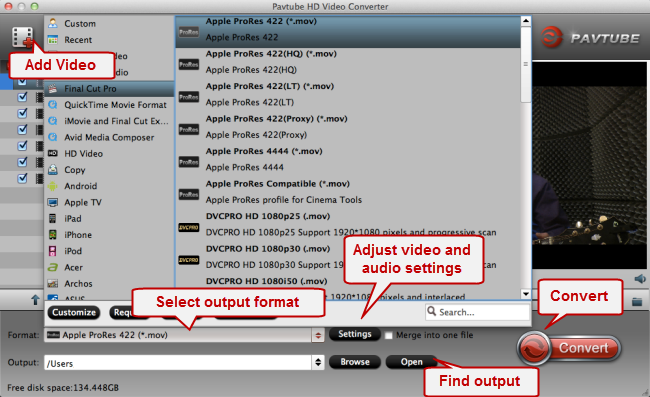
Step 1. Add recorded video files into this program
Download and install Mac Canon 5D Mark III Video Converter. As soon as the main interface pops up, click “Add Video” or “Add from folder” button to load Canon 5D Mark III video files.
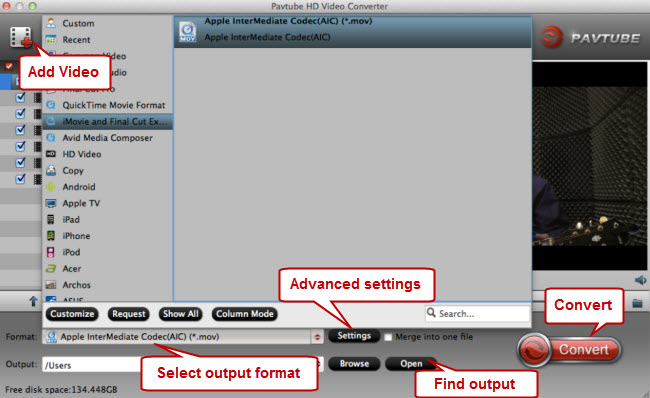
Step 2. Select output format
Click the “Format” bar, and select output format from the drop-down list, as we are converting Canon 5D Mark III clips to ProRes, so we choose Final Cut Pro > Apple ProRes 422 (*.mov) as output format. If you are using FCP 7, you can choose Final Cut Pro > Apple ProRes 4444 (*.mov) as output format.
Tips: This Mac Canon format converter program offers a couple of ProRes formats for users to choose from, including Apple ProRes 422, Apple ProRes 422 (HQ), Apple ProRes 422 (LT), Apple ProRes 422 (Proxy), and Apple ProRes 4444, you can select one as target format depending on your requirement in post production.

Apple ProRes 422 – Higher quality than Apple ProRes 422 (LT);
Apple ProRes 422 (HQ) – Keep original video quality for editing in FCP;
Apple ProRes 422 (LT) – Get a smaller file sizes than Apple ProRes 422;
Apple ProRes 422 (Proxy) – SD levels – 480i/p and 576i/p. Used in offline workflows.
Apple ProRes 4444 – Edit and finish 4:4:4 material.
Step 3. Setting video and audio profile (for advanced users)
If you don’t like the default setting, click Settings to adjust the video resolution, frame rate, audio channels, bit rates etc. Meanwhile, click Output Folder to choose a folder to save the converted ProRes MOV files.
Step 3. Start Conversion
Once you have all the required settings, you can click on the Convert button to automatically start the conversion. You can expect good output quality after converting your Canon EOS 5D Mark III MOV videos to FCP. When the conversion is done, simply click ‘Open’ button to get the exported ProRes files for using within Final Cut.
Also read:
Convert/Import Canon EOS 5D Mark III footage into iMovie 8/9/11
Import EOS 5D Mark III 1080p MOV to iMovie, FCE, Avid and FCP (X)
Editing/Transcode Canon EOS C300 MXF footage to ProRes codec for Final Cut Pro
Play Panasonic AG-HPX170PJ MXF files to Quicktime Player on Mac
AVCHD to FCP Workflow-Convert Canon EOS C100 AVCHD to FCP for editing